

How To Loop An Animation In Blender
In my previous article I've explained how to import Synty characters into Blender, and how to apply animations from Mixamo. Now that nosotros have an blitheness in there, nosotros may want to play it more than one time. In a walk cycle, we'd accept to play the walk loop multiple times to create the illusion of walking. I'll comprehend how to do that in this article earlier I forget again.
PS: These are only notes, not exactly a tutorial. I've only simply discovered the basics of the NLA Editor, so if I'm mis-describing anything and you know meliorate, or something isn't working, please go out a comment so I tin can correct this commodity.
Here's what nosotros'll do:
- if necessary, remove the forrad motion from the current animation
- turn the keyframe blitheness into an Action Strip (that's an NLA Block)
- add the Activity Strip to an NLA Runway (that'due south a special timeline)
- alter the Action Strip to repeat
- apply forrad motion with two keyframes
The concept of the NLA Editor is similar to aniBlocks in DAZ Studio, or the NLA blocks in Carrara. We start with regular keyframes, plough them into a block (or Action Strip as Blender calls them), and then we mix and match them on a special timeline called the NLA Editor. If you're curious, NLA stands for Not Linear Animation. Activity strips can be mixed and matched to blend in, so there'due south no popping when i animation ends and one begins.
The NLA Editor can be used in conjunction with regular keyframes. For walk cycles, it is mutual to exclude the forward motion from the Activity Strip and instead replace it with a linear motion. If the forrard motion is included in the Activeness Strip, the grapheme would reset to the beginning rather than continuously motility frontward. Hence I'll utilise a combination of the two.
Importing your FBX animation
While we can create animations straight in Blender, I'll focus on using the one we've imported from Mixamo in my earlier article. Here'south what my interface currently looks like (I'm using Blender 2.82).
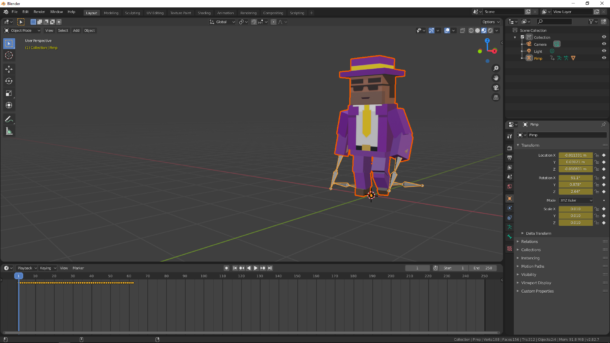
It's a unproblematic walk cycle with a elapsing of 62 frames. My default animation duration is 250 frames, and then after walking ane bike, the grapheme stops. Let's make him repeat this cycle four times and have him walk out of our frame.
If you've exported a walk bicycle with the in-place option ticked, y'all're good to go. If you did not, then your graphic symbol will move forward and we'll need to remove this motion. In my example that's the case, and judging past the green line in the Blender Viewport, nosotros need to delete all keyframes that propel our little guy on the Y centrality.
Removing Forrad Move
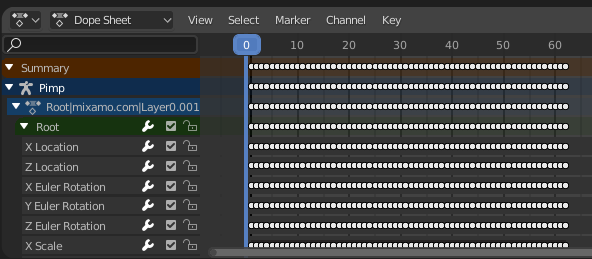
Switch into the Blitheness Tab at the meridian. This brings up the Dope Sheet in the bottom window, which will be handy to use here. If it does not, make sure to modify it into the Dope Canvas. Aggrandize your grapheme like I did below to see the location/rotation values.
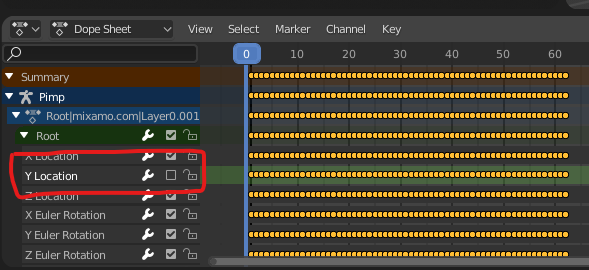
To preview what we're most to exercise, y'all tin can deselect any of the keyframe tracks. Disabling the Y Location does indeed what we want (in my case anyway), so it'south safe to proceed with the next step: selecting all Y Location keyframes and deleting them. I'll de-select everything (A) beginning, and then border-select around the Y-Location keyframes and press X. Here'due south what I'one thousand left with:
Turning our animation into an Activeness Strip
Bear with me while you read this: We need to change the Dope Sheet from Dope Sheet Mode into Activeness Strip style. I know this doesn't make a lot of sense, merely that's the style Blender was fabricated. Allow me see if I can re-phrase this:
We're in this editor called the Dope Sail. It's a traditional blitheness term really, like a written list akin to a storyboard, only with animators in mind. Wikipedia has an article with more details if you're interested. In 3D apps, the Dope Canvass looks very different only serves a similar purpose, namely giving instructions to the app on how to behave during the animation.
Blender in particular has a Dope Sail window (carmine box in the screenshot), only this window has various ways to display its data. There's Dope Sail Mode, also every bit Activity Editor Manner, and a few other options. You tin can switch between those with the menu next in the dark-green box in the screenshot.
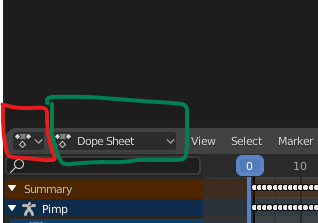
One time switched into Action Editor mode, you'll see two buttons that are somewhat related: Push Downwards and Stash. You'll also see a menu of available NLA Blocks as a driblet-down list (mine currently shows Walk). Let me tell yous how I understand these things.
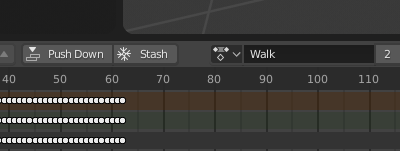
Push Down will turn the current keyframe animation into an Action Strip and adds it to a new NLA Track. Stash will do the aforementioned, only won't place the Activity Strip onto a track. That'due south handy if y'all're importing several animations into your projection, for which you lot'll "stash abroad" this scrap, then delete your graphic symbol, import another one, stash that activeness away, and so forth. Then later you'll put the Action Strips together and turn them into an animation. I think.
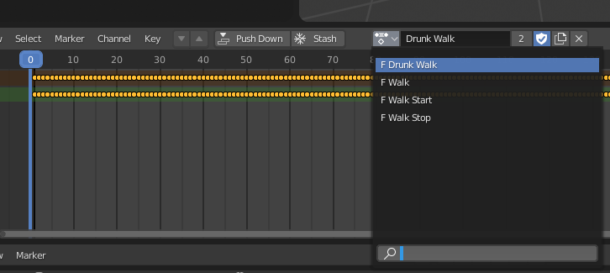
Speaking of which, and to add some groundwork info here: if you had more than one Action Strip already in your projection, you tin utilize the driblet down list and selection the one you'd like to "recall" as it were. Pick 1 from the list and run into its keyframes populating the timeline underneath. Like this:
I'll stick with my original one (Walk) and hit Button Downwardly. Note that when I do this, all keyframes seemingly disappear. But that'due south OK, equally nosotros'll find out in the side by side step.
Using the NLA Editor
We're done with the Dope Sheet, and I'll switch it into the NLA Editor to save some screen real estate. It'south personal preference if you open another panel for this simultaneously, it's just a matter of knowing where and how to practise this. I like to click that little nondescript icon at the far left and choose Nonlinear Animation.

Yous'll see something like this, which warrants farther explanations:
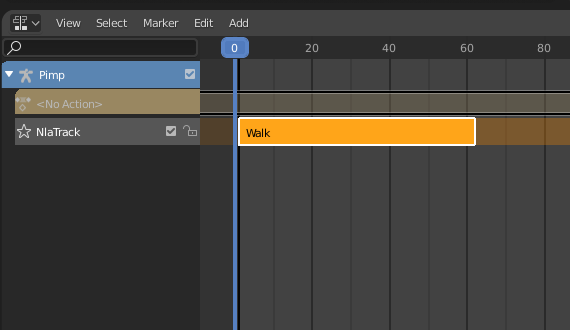
The orange block is an Action Strip on the NLA Timeline. It currently has a single track (called NlaTrack). Nosotros could add more and overlay animations, similar an eye blink while walking but nosotros won't go that far here. More than options volition appear when you lot printing N to bring up this window on the right paw side. Don't get scared, in that location are Manner more options here than we'll need:
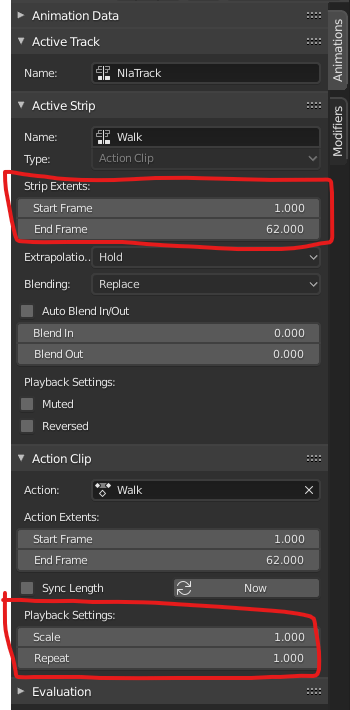
I've highlighted two areas of interest: the electric current length of the clip (62 frames in this example), and the fact that it currently does not repeat. Notice how Blender distinguishes between an Activity Strip and an Activeness Clip. As I empathize it, a strip is the department of raw keyframes, whereas a clip is how these are played back. And then a clip can repeat the whole strip, or portions thereof, without impacting the underlying keyframes in the strip.
For our walk cycle, let's set the Echo value to 4. This will loop our walk cycle and extend the whole duration of our little guy walking from 62 to 248 ( = iv ten 62). If your animation bicycle is longer, accommodate the timeline accordingly, otherwise your cycle will stop earlier than you desire.
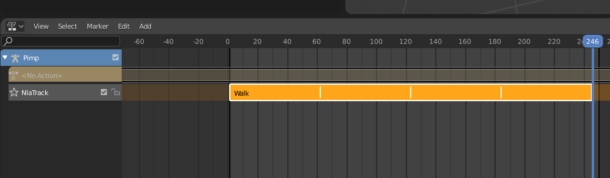
Now how our NLA rails at present shows these fiddling white separators at which the prune repeats. When you press play, you should see your character walk in place several times.
Adding Forward Motion
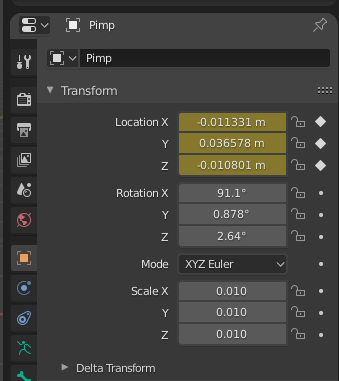
We're done with the NLA Shenanigans for now, and so switch dorsum to the Layout Tab. This will show the regular keyframe timeline at the bottom. Park your playhead on frame 0, brand sure the character is selected, and open up the Object Properties panel. It'southward the trivial square icon in the sidebar.

While parked on frame 0, hover over the location box and press I (as in "the key between U and O on the keyboard) to create a keyframe. The location panel should turn yellow.
In the timeline you'll discover a keyframe at this point. At present move your playhead to the last frame of your looped blitheness, select your graphic symbol and movement him forward. For me that's the Y axis, then I can press Yard Y and slide him forward a bit. It's eyeballing at this signal how far he needs to walk during this fourth dimension, and we can modify it later. When he's at the right position, left click to drop him.
Observe that the Object Backdrop are greenish at this point. That's Blender'due south way of telling you there's no keyframe hither, and all values are interpolated. Hover over the Location box again and click I to prepare a keyframe, making the values turn yellowish again.
Congratulations, your character should now walk along an invisible path.
Tweaking the interpolation to linear
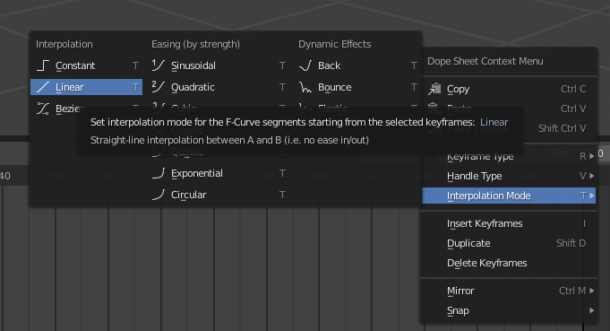
Find when you press play on the timeline now, your character starts walking slowly, speeds up, then slows down again earlier he stops.
To turn this into a fully linear animation with steady speed, we need to change the interpolation type of either keyframe from the default Bezier to Linear. Practice this past hovering over the last keyframe in the timeline (or the first, it doesn't matter in our case), correct-click and choose Linear.
And that's information technology! In that location'southward plenty more to practise with the NLA Editor, simply this should get you lot started for looping animations. I've explained some more than of its features in this article.
Source: https://www.versluis.com/2020/03/how-to-loop-walk-animations-with-blenders-nla-editor/
Posted by: breesehicasonfut.blogspot.com
0 Response to "How To Loop An Animation In Blender"
Post a Comment